Wednesday, November 4, 2009

Flu mask

Prevention is better than cure. Let’s wear masks not only to prevent AH1N1, but dust and pollution around us! You have a choice to protect yourself and your family.

Don't count on simple disposable masks to completely protect you against the pandemic flu. The loose fitting masks were designed to help stop droplets from spreading from the person wearing the mask. They also protect the wearer's mouth and nose from splashes. However, they are not created to protect the wearer from breathing in very small particles. Do not ever re-use these masks as they would have already collected virus and must be disposed of.

If a flu pandemic is coming, but you have to get out and about, there is now a creative way to express fear. Something functional can also be a form of self-expression. Be it cute, be it universal, we make them all look cool for the person, especially a kid to feel cool and at ease with the surroundings of a possible pandemic.

Our Comfy Masks, are made for just that. They are similar in appearance to the relatively inexpensive face masks but are designed to protect the wearer from breathing in particles. These masks have layers of filtering ability, fit more snugly on the face than face masks so that air is breathed through the filter. Most importantly, they are more breathable than the N95respirators and affordable.


We have various designs of cartoons for children or studs for fashion, printed on the outer layer of soft cotton cloth.  You are welcome to make enquiries for retail purchase, personalize for yourself, or custom-make in bulk for your business.


Wednesday, October 21, 2009

How to set dye with clothes just bought

The problem with this question is that you don't know what dye was used, when you buy clothing. A treatment that will help set acid dyes will tend to strip off fiber reactive dyes, while the carbonate that will set fiber reactive dyes won't do any good for union dyes. You must match such chemical treatments to the exact dye type that was used, for acceptable results. Furthermore, such treatments are best used at the time of dyeing, rather than much later.

Vinegar is not the answer!
Many people who know nothing about this subject recommend 'setting' dye in cotton clothing with vinegar. In fact, vinegar can do nothing useful for cotton dyes. Vinegar will help set some acid dyes,but only if applied while it is gradually heated to a simmer (generally in the presence of salt), solely in cases in which this necessary part of acid dyeing was omitted; acid dyes are used on silk, wool, or nylon, but never cotton.

Salt won't do it, either.
Salt can be useful in dyeing, by encouraging the fiber not to repel the dye, or by making the dye less soluble, but it will not itself fix the dye to the fiber. Washing your garment with salt won't hurt it, but it also will not help. The extra washing will help to remove the dye only because it's another run through the washer, which can help to remove excess dye.

Washing Out Excess Dye.
In some cases, the clothing may be dyed correctly, and also have excess dye in it. This is true of fabrics dyed with fiber reactive dye that have not been washed adequately. In such cases, the simplest solution is to simply go ahead and wash -repeatedly. The test for whether all excess dye has been removed is simple: dampen the dyed item and iron it dry, while pressing it against a bit of white fabric. If the undyed fabric stays white, the dyed fabric (or yarn) can be trusted. Normally, the most popular fiber reactive dye, Procion MX type dye, requires at least one washing in cold water (without detergent, unless it's Synthrapol), followed by at least two washings in hot water, WITH detergent, to remove the last bits of unattached dye. Hot water is much more efficient than warm water at removing the last bits of unattached dye.

Thursday, October 15, 2009

Silk screen printing

Step 1
Create your artwork. If you don't know how to do that, sketch out the general idea. Sit down with your screen printer to work out the details. If your screen printer can't create your artwork, find a graphic artist.

Step 2
The screen printer will review your artwork and discuss the type of garment you want to have it printed on. Most people who print garments will have a supplier for apparel. If you're not sure of the type of apparel you want, ask your printer. They will have ideas for you. It is also acceptable to take your own. If it is something other than 100% cotton, there might be a slightly higher fee for the ink because other fabric may require ink additives.

Step 3
Bitmap image - Has pixalated edges Once you have settled on a garment and the artwork, the screen printer will go to work. The first step is to prepare the artwork to be burned on the screen. Artwork that is received in a bitmap format (giff, tiff, jpeg), will need to be vectored. There is a big difference between bitmap and vectored art. We were taught Bitmap=Bad, Vector=Good. Vectored art has clean lines while bitmap has pixels. The larger you make bitmap art, the more jagged the edges get. A vectored image can be changed, a bitmap can't.

Step 4
Screen Printing is labor intensive. It involves coating a screen, burning the image and applying the ink.

1. Screens are coating using emulsion or capillary film. Both involve drying time.

2. When the screen is dry, the artwork is burned into the screen. The process involves creating the artwork, putting it on a laser paper, exposing it, and washing it out. One of the really nasty parts of this is the wash out. If the screen is not coated correctly, parts of the design will wash out and the process starts again.

3. When you have a perfect screen, it is time to screen the shirt. If you are doing artwork that involves two or more colors, a screen must be burned for each color.

4. The inks used for screening differ with the fabrics.They also change based on the desired texture. Puff paint is really fun to work with and I like the foils.

Step 5
When everything is ready, it's time to apply the ink. If it is a 2 color process, the bottom color goes on first. You pull the ink across the screen leaving one coat. Most require 2 pulls to make sure that the ink on the shirt is consistent. The ink is then flash dried. This cures the top portion of the ink so the next color can be applied. You change the screen and pull the ink for the other color. Again, usually two pulls.The top layer is then flash dried. The shirt is pulled from the platen (form where the shirt sits for printing) and dried. Drying generally is 40 seconds. Again, different inks require different drying times.

Tuesday, October 13, 2009

Make ripped/ torn denim jeans

Hollywood stars glam up with an awesome pair of torn or ripped denim jeans which can cost hundreds of dollars. How would you like to have a pair with little or no cost at all? It’s quite easy actually.

Step 1
Insert a block of wood or a thick card board inside the pant leg under the area where you will add the rip or shredding. You can use an old pair of jeans or get a new pair from a thrift store. It does not need to be expensive or branded.

Step 2
Slice using utility knife. Start slicing the fabric horizontally using the utility knife. Make sure that you will not cut through the other side of the fabric. You can put the rip in areas that you wouldn’t naturally tear to make it look better. Vary the width and length of the tears as well… be creative.

Step 3 Pumice stone
Roughen and scrape the fiber in the ripped area by rubbing with a pumice stone or sandpaper. Be careful not to rub it too much and cutting the horizontal fibers.

Step 4
Pick the threads apart using a pin or needle to add an extra shredding.

Step 5
Wash and dry before wearing the ripped jeans to further fray the fabric. That’s how easy it is!

Sew button with added security

Losing a button can not only be embarrassing if it happens in public, but it can also mean the end for an favorite pair of shorts or button up shirt. Just by taking a few extra precautions with button sewing, you can save embarrassment, time, and the expense of having to purchase a new article of clothing. The following are steps to take to avoid losing this small but very important fashion necessity.

Step 1 - EXAMINE THE BUTTON OR BUTTONS.
This technique of resewing your button works best with buttons that have four holes, but will also work with two hole buttons. Examine the thread that is currently securing the button. If the thread is already loose, go ahead and pull it out from around the button. If the thread is tight, then leave it alone, but still perform this technique over top of the existing stitching.

Step 2 - CHOOSE A THREAD
There are different threads to choose from when deciding which thread to use to secure your buttons. If your button is crucial such as one that holds up your pants, then it may be beneficial to use a more industrial thread. Otherwise, a general all purpose thread will work fine.

Step 3- THREAD THE NEEDLE
Thread the end of one side of the thread through the eye of the needle. Match the two ends of the thread together and tie them into a knot.

Step 4 - SECURE THE THREAD TO THE ARTICLE OF CLOTHING
Decide where the button is going to be sewn if it is not already secure. Take your needle and take a small stitch into the fabric. Do not pull the thread all the way through. You should have the needle on one side of the stitch and the hanging thread on the other. Split apart the hanging thread so that it forms a loop. Run the needle through this loop and pull tightly.

Step 5 - SECURE THE BUTTON TO ONE POINT
If the button has four holes, then begin to stitch the needle through two of the holes and back through the the fabric remembering to pull the thread tightly. Continue this motion approximately 4 times. With the needle to the back of the fabric, take one more siny stitch through just the back of the fabric knotting the thread as you go. Cut the thread just beyond the knot.

Step 6 - REPEAT STEP 5
If you are working on a button with four holes, Repeat this step though the other set of holes. If your button only has two holes, repeat this step through the same holes. The object of this whole technique is to secure the button with more than one set of threads so that if one of your threads breaks then the other one will still be intact.

Repair clothes dyed by accident

Step 1
Take white clothes that may have gotten dyed by accident during a washing cycle and do not dry them. Instead, immerse them in a bucket with concentrated pure lemon juice and let them stand overnight. After 24 hours you may wash them as you normally would and put them through the dryer as well.

Step 2
Add Rit Color Remover to the water when washing whites dyed by accident. This is especially effective when the discoloration is due to washing the white clothes with other garments dyed with Rit. Depending on the depth of the stain, you may need to repeat this process as the first wash may lighten but not completely remove the unwanted dye spots.

Step 3
Rinse white clothes, accidentally dyed due to contact with a rusty gadget, under cold water until the stain changes from an angry red to a tan or yellow discoloration.

Step 4
Use Rit Rust Remover on such clothes and also for whites dyed accidentally due to exposure to clay and rust contained in water. This product only works on white clothes and will remove the yellow discoloration usually within one washing.

Step 5
Blot with a white paper towel any white clothes dyed by accident with ink. Spray hair spray on a clean sponge and gently rub the ink stain. Rinse the garment completely. Finally, wash as usual, adding OxyClean stain fighter.

Step 6
Soak any white garments that do not respond to your dye removal attempt overnight in hot water and OxyClean. This is a matter of last resort and should this step fail, repairing your clothes dyed by accident, will require covering up the stains with either patches, whimsical shapes that may be ironed on, or a swatch of color that closely matches the white of the garment.

Fast fixes

Buttons
Before you ever wash a garment or hang it in the closet, check for loose buttons and repair any that need. Doing this regularly helps prevent having to replace an entire set when loose ones go astray. When you make a garment, take a clue from ready-to-wear and sew an extra matching button inside the side seam so you’ll have it when needed.

Split seams
If you have split seams, simply stitch them up before the openings become larger after being subjected to more stress from wearing. If the fabric is actually damaged, back it with lightweight fusible interfacing as an added reinforcement before stitching the seam.

Tear
For tears that aren’t within a seam but where fabric is actually torn, use the mending stitch on your sewing machine to repair. Follow these simple steps:

* Trim any frayed edges and back the damaged fabric with fusible tricot interfacing, pulling together the torn edges. A narrow strip will hold the torn edges together for stitching.
* Set the machine for a mending stitch or triple zigzag – one that goes 3 or 4 stitches in each direction forming a multiple zigzag. Adjust the length so it’s fairly close together and the width so it is wide enough to span the torn edges.
* Stitch over the torn edges catching each edge with bite of the zigzag stitch; turn each corner if needed. Depending on the fabric and the tear, a second pass of stitches may be needed to secure catch the edges

Patch
Tears can also be camouflages with patches placed over them. Commercial patches are available in standard colors, or you can create your own patch using matching fabric. Some patches are fusible, others require sewing around the edges.

To apply a sturdy patch, fuse the tear layers together to prevent further damage, then fuse the patch over the tear. If the patch isn’t fusible, make it so by using paper-backed fusible web under a fabric shape. Then zigzag or multi-step zigzag around the patch edges to hold in place.

A host of decorative patches are also available that can be used in appropriate places – like torn knees on childrenwear, or a jacket sleeve with a small tear. The construction ranges from machine embroidered to glittery sequined versions.

Suede elbow patches are available specifically to cover worn out elbow areas on much loved jackets.

You can also patch clothes with appliqués made from contrasting fabrics and cut into any shape – for children’s clothing, let the wearer create the shape.

Hems
It’s easy to catch a hem in a heel of a shoe and soon the pant leg is dragging on the ground and wearing out the fabric.

For an immediate fix, tape the hem up in its original position with transparent tape until you can get home to fix it.

For a quick fix, use fusible web to hold up the loose hem allowance. For a more professional finish, restitch it in place using the same type of stitch it was originally sewn with. Anchor the threads well into any sections that are still intact, overlapping the new stitching with the old.

Garment care

You spend precious time constructing and perfecting the fit of your sewn garments, so be sure to take care of them once they are done. Proper care will prolong their life and make them look great for the duration

Hangups
Properly storing clothes in your closet will help them keep their shape. Use padded hangers for tailored garments that need shoulder shaping – wimply wire hangers don’t offer enough support.

Hangers come in several sizes, from child size to 21” across, and they are made from many different materials. Wire hangers are fine for lightweight clothing made from woven fabric. Plastic hangers offer more support, but wooden and soft padded hangers offer the ultimate support for fine garments.

If things have a tendency to slip off the hanger, look for non-slip hanger covers, or sew loops into the garment shoulder seams to keep things in place, especially those items made from slippery fabricor with wide necklines. Flexible hangers are also available to allow for shaping garments and keeping wily ones inplace.

Button garments when you place them on the hanger – it saves wrinkles and pressing later on.

For knit garments, use padded hangers for sturdy knits, but fold delicate or loosely knitted items to prevent stretching. Store folded knits in a dresser drawer, on a shelf, or in a closet storage bin.

Cleaning capers
When you purchase fabric, read the bolt for proper care instruction and make yourself a note if you are prone to forgetfulness. Pre-wash or dry clean fabric before you sew them to prevent shrinkage later when it is already been made into a garment.

Hang clothes back in the closet only after they have been inspected and cleaned. Any residual stains on a garment become very attractive to moths and other pests. This is particularly important when storing out-of-season clothing.

Check underarm areas carefully, as excessive sweating and some deodorants can actually weaken and discolor fabrics. Protect garments during wearing with dress shields or sleeved camisoles.

Shapes, sizes and what to wear to look great

Women’s bodies come in a variety of shapes and sizes, and most can be put into one of the 5 categories. Some pattern companies list which body shapes each pattern is best suited to. In fashion, the key to looking your best is to identify your body shape and learn which styles best flatter that shape.

Identify your body type
Stand in front of a full-length mirror wearing your undergarments, a leotard or bodysuit. Begin at the shoulders, visually separate your body into 3 areas: the shoulder/bust, waist and hips. Imagine a line that runs along the outside of the body at these 3 points. Which shape best defines your silhouette?

1. The hourglass

Sometimes referred to as the ideal figure, this balanced figure is marked by wide shoulders, a full bust, a narrow waist and wide hips. It has a defined waistline, and the bust and hips are nearly the same size. The object is to show off your narrow waist and curves without overemphasizing your hips and bust

What to wear

Choose shirtwaist dresses, tailored jackets, straight skirt and slim pants. Tuck in blouses. Good fitting princess-seam dresses add length and show your shape. Wear straight skirts, trim pants, and pair full skirts with close-fitting tops. Wear contrasting colors to show off your shape. Details should be of equal interest on top and bottom to keep balance. Choose vertical lines to give an appearance of length to your silhouette

What not to wear
Stay away from empire dress or tops,especially if you have a full bust. Full or boxy shapes (shirts worn untucked) cover your best asset – your defined waistline. Also steer clear of full tops with full skirts, full pants and overall boxy styles or pieces made with bulky heavy fabric.

2. The triangle
The triangle defined by narrow shoulders and a small bust extending to significantly wider hips. This figure is known as the pear shape. Give the upper body interest, drawing the eyes up away from the hips. Create balance by accentuating the shoulders and bust and minimizing the hips.

What to wear
Choose designs that have detail at the neck and shoulders, drawing the eyes up and out. Accent scarves and boat necklines with contrast trims are good choices, as are neckline embroidery,shoulder yokes or wide collars. Dark colors on the lower body, with lighter colors above, draw the eye up. Ensembles of a single color with contrast at the neckline will give a sleeker look.Shoulder pads help balance the silhouette. Shirts that hit above or below the hip will be more flattering than those at the end at the widest part of your hip. Skirts should be a bit longer and hover around the knee.

What not to wear
Stay away from tops or shirts with hemlines that fall directly on the hips. Garments with diagonal sleeve seams,such as raglans or halters, draw the eye down. Skirts or pants with patch or inseam pockets, bulky side seams, or pleats draw attention to your hips. Avoid short skirts that end well above the knee.

3. The inverted triangle
Defined by broad shoulders, a full bust and heavy upper arms extending to narrow hips, balance this figure by adding interest to the lower body.

What to wear
Choose styles that have details below the waist, such as pockets, pleats, a dropped waist, peplums, yoked skirts and skirts with border prints. Tops with V-necks, raglan sleeves or diagonal designs pull the eye down. Wear dark colors on the upper body with lighter colors on the lower body.

What not to wear
Garments with a lot of upper body detail (wide collars and lapels, yokes, ruffles and shoulder pads) draw the eye to your larger upper body. Wear skirts a little shorter and avoid capris or strongly tapered pants.

4. The slim Rectangle
In this lithe figure, the shoulders and hips are very similar in width with little definition at the waistline –straight up and down with a lack of curves. The object is to give the illusion of curves and define the waist or to enhance the look of the hips and bust

What to wear
Wear styles that have detail on the bust and on the hips. Choose designs that have horizontal lines, adding dimension to your shape. Consider unstructured tailored jackets with wide shoulders and wide lapels, or jacket with small lapels and taper at the waist. Try pair contrasting colors on the top and bottom pieces, if desired. Pair full tops with flared skirts or pleated pants. Wear pants with full or flared pant legs and narrow waistbands. Bulky sweaters and baggy pants work for this body type

What not to wear
Wide waistbands or blocks of colors at the waist draw unwanted attention to your proportionally larger waist, as do large patch pockets, large plaids and patterns with vertical stripes.

5. The wide rectangle

This body shape is nearly straight up and down. Instead of being slim,however, the figure is wider. To enhance, slim the overall appearance and add curves.

What to wear
Start with monochromatic colors and/or muted shades in complementary colors. Sheaths or body skimming styles with neckline or shoulder details draw the eye up. Princess seams, or a center-front seam, create a vertical line, drawing the eye up and down. Wear pants with narrow pant legs, straight skirts, and shirts with sleeves that taper toward the wrist and vests or jacket that fall below the waistline. Think long and sleek.

What not to wear
Blocky, bold, contrasting colors and boxy garments accentuate your width. Details that draw attention to your waist (large patch pockets, belts and peplums) add pounds.

Best way to clean inside of your iron

If the iron has a self-cleaning function, activate it following the manufacturer’s instructions.

If the iron doesn’t have a cleaning function, flush it with naturally bottled spring water–pure and simple. Avoid using vinegar or any chemicals, as they may damage the water tank in some irons.

To flush the iron, fill it with water and let it heat to the cotton setting temperature. When it’s heated, depress the steam button until all the water has emptied from the iron. Repeat this process 4 to 5 times for a thorough flushing.

Friday, September 18, 2009

Tips on drying

* Lightly shake out items taken from the washer, before placing them in the dryer. Tightly balled up fabric dries slower and will likely come out wrinkled.

* Don't overload the dryer. A stuffed dryer will not allow the items to tumble. Drying will be slower and clothes will wrinkle.

* Keep like garments together. Permanent press items should not be dried with towels, and delicate items, such as lingerie should be dried separately.

* All clothes should be left in the dryer just long enough to remove wrinkles and moisture. Any longer and the heat can actually "set" wrinkles, increase static cling, and cause shrinkage. This can be true for both natural and man-made fibers.

* Use the proper heat setting and time cycle. Don't use a high or regular setting for all clothes. Read the label! Fabrics made from fibers which have low moisture absorbency are fast drying and should be dried using a low temperature setting. This includes:

Acrylic
Nylon
Polyester
Polyolefin
Microfibers

* After removing garments from the dryer, immediately hang them up or fold them. Don't let them lie in a heap. This can cause them to wrinkle.

* Permanent press items should be taken out slightly damp and hung on a non-rust hanger. Close clasps and button buttons. Straighten fabric lines and creases, and gently brush out any wrinkles.

* Keep the lint filter clean. A clogged filter increases drying time and costs more money in electricity/gas usage.

Remove common stains

Blood

If wet, rinse with luke warm water. If dry, soak in ammonia solution, then treat with dilute [2-5%] oxalic acid [found from auto radiator cleaner and in bar tenders cleanser

Coffee
Wash in concentrated salt water

Grass
Fresh stains maybe removed using alcohol; older stains try sodium perborate solution[drug store]. On white clothing, bleach followed by sodium thiosulfate solution.

Ink
Dissolve in alcohol or acetone [dissolves acetate fabrics] and cover solvent-stain solution with cornstarch or paper towel. Usually needs to be repeated several times.

Iodine
Chemically react with a solution of sodium hyposulfite [hypo or photographer's fixer]

Rust
Try citric acid [Tang, Gator Aid, or Crystal Light drink powder] or 5% oxalic acid with 5% glycerin.

Monday, August 24, 2009

Did you know?

What is the origin of denim?
Two of the fabrics most symbolic of American fashion - chambray and denim - are in reality French imports. A soft comfortable fabric with contrasting colored and white yarns, chambray was first found in Chambrai, France. Denim, originating in Nimes (as in "serge de Nimes"), was introduced to this country via work pants designed for the mining industry by a Mr. Levi Strauss.

How did the T-shirt get its name?
One of the earliest prototypes for the T-shirt dates to 1880, when sailors in the U.S. Navy were issued an elbow and hip length undershirt; when laid out on flat surface, it resembled a…perfect "T".

What's the difference between cotton and linen?

Natural fibers fall into two main groups: protein fibers, which come from animals, and vegetable fibers which come from plants. The main ingredient in all vegetable fibers is cellulose, a carbohydrate found in all plant life. Both cotton and linen are vegetable fibers. Linen is made from the flax plant, cotton is made from the cotton plant.

Why do cotton and wool shrink when you wash them?
There are two kinds of shrinkage. Progressive shrinkage occurs when the fiber itself shrinks. Wool fiber shrinks a little more each time it is washed, which is why wool is usually dry cleaned. Relaxation shrinkage is when the fabric shrinks. It is caused by the tension applied to yarns and fabrics during construction. The tension is released when the fabric is washed or steam pressed, causing it to shrink to its natural size. Most cotton fabric shrinkage occurs during the first wash.

What makes cotton wrinkle?
During wearing and cleaning, fabrics are temporarily distorted to accommodate the stress of use. If the fabric does not recover its original shape, the results are described as wrinkling. Untreated cotton fibers do not have a permanent memory. The cellulose chains in the fiber move by breaking and re-establishing hydrogen bonds. There are no natural forces to promote the cellulose chains to return to their original configuration.

Does cotton clothing have to be dry cleaned?
Cotton is easily laundered at home, but some fabrics and garments may be dry cleaned instead. Watch out for: embossed designs, loose knit weaves that snag easily, delicate embellished fabrics, linings, shoulder pads and inner construction, special finishes that come out in the wash, and garments that require professional pressing and finishing, such as starched oxford shirts.

Are cotton panties more hygienic than synthetic ones?
Man-made fabrics don't provide the same ventilation that natural fibers do. Because fungi flourish in dark, moist environments, constrictive, synthetic garments can create an ideal habitat for yeast to multiply. All-cotton underpants permit air to circulate below the waist. Due to its unique fiber structure, cotton breathes and helps remove body moisture by absorbing it and wicking it away from the skin.

How can you pack cotton clothes so that they won't get all rumpled?
Cotton knit sweaters and tee-shirts can be rolled and placed in your suitcase to prevent wrinkling. Garments made from woven cotton fabrics such as button-down shirts and trousers should first be folded along their natural creases. Then drape each garment across the suitcase so that the ends hang over the sides. Alternate putting the top of each garment on the right and left side so that the thickness remains uniform. Next, fold each item around the other, alternating the overhang from right and left sides. By following the "inter-folding" method of packing, your clothes cushion each other and are less likely to get crumpled.

Are khakis and chinos the same thing?
Once upon a time both chino and khaki were fabrics used in military uniforms; today these words are used interchangeably to refer to the tan-colored pants inspired by military looks.

Khaki is derived from a Hindu word that means "dust color." Originally, khaki referred to a dull yellow-ish brown cotton or wool uniform fabric used for its camouflage effect by the armed forces of England, France and the U.S. since the mid 19th century; in World War I, a green tint was added. Khaki work pants and jackets were adapted for sports by men and women in the 1950s and 60s.

Chino has its roots in World War I when the U.S. army purchased this durable cotton twill from China for use by soldiers in the Philippines. In the late 1950s it was adapted by men and boys for school and general wear, particularly for pants.

Tuesday, August 18, 2009

Wrinkle-free clothes

Do you like to wear shirts in the office, which you do not need to iron after washing, so called non-iron shirts? Unfortunately after a few washing cycles this property gets lost, they become wrinkled and need to iron them.

Everyone is short on time and ironing is a pain. To make cotton clothes wrinkle free it needs to be blended with other synthetic fibres like polyester. So in the early 1990s, textile companies began to apply finishing agents to fabrics to prevent or decrease wrinkles. These particular chemical agents act as catalysts that cross-link polymer chains in the cotton weaving, giving the material some elasticity and resilience. In short, this treatment makes clothes wrinkle-free.

Due to the increasing demand for 100% cotton fabrics, durable press finishes are being used on these clothes. Generally, cotton fibers are spun into yarn, woven into fabric, and then dyed, and the last part of the process is treating it with a 'cross-linking' resin. The applications of formaldehyde based reagents that are used to create these apparels are now creating ripples all across the globe backing up with concerns for human health and environment

Several problems have been associated with wrinkle-resistant finishes, such as attracting grease and oil stains, fabric degradation and environmental concerns. Most of the problems have been minimized but companies are constantly finding ways to improve the properties.

Home care:
a) wash the material at lower temperature settings, low stress cycle, weaker detergents - to reduce loss of structure
b) find clothing with more polyester in it - to strengthen structures, or
c) iron every now and then and making sure that the clothing cools in a dry, pressed state - to regain structures.

Friday, August 14, 2009

Understanding the Care label system

The entire care label symbol system, as designed by the ASTM and approved by the FTC, is based upon five basic symbols which represent five basic care operations. These are: a washtub with a water wave for the washing process; a triangle for bleaching; a square for dying; an iron for ironing; and a circle for dry cleaning. Only one safe method of care is required on the label - usually either laundering or dry cleaning.


In addition, the "X" symbol can be superimposed on any of the symbols whenever there is evidence to support that using that process could damage the apparel.


To adequately represent the laundering process, at least four symbols must be used in the following order - washing, bleaching, drying and ironing. If you have evidence that dry cleaning will damage the item, and you wish to warn against it, add the dry cleaning symbol with an X after the four other symbols.


For garments that must be dry cleaned, the dry cleaning symbol must be used at a minimum.


Using additional symbols to clarify proper care.

Additional symbols or words are also used within and below each basic symbol when it is necessary to further define proper care instructions.
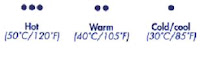
Washing: A water temperature must be given if certain temperatures would damage the garment. The following system of dots can be used within the washtub to indicate suggested water temperatures for washing.
Six dots = 95 C/200 F
Five dots = 70 C/160 F
Four dots = 60 C/140 F
Three dots = 50 C/120 F

Two dots = 40 C/105 F
One dot = 30 C/85 F.

The washing machines used by most U.S. consumers, however, do not heat the water to a precise temperature. In addition, many consumer washing machines cannot attain the very high temperatures indicated by six, five or even four dots. For this reason, the FTC consumer chart (shown below) shows only three dots for hot, two dots for warm and one dot for cold/cool. Unless you intend for your product to be professionally laundered at very high temperatures, you will probably want to use one, two or three dots and explain to the consumer that these correlate to cool, warm and hot.


Underlining the tub once indicates the permanent press cycle, and underlining it twice indicates the delicate-gentle washing cycle.


Bleaching: The triangle means all bleach can be safely used. If chlorine bleach cannot be safely used, diagonal lines should be included within the bleaching triangle to indicate non-chlorine bleach only. If no bleach can be safely used, an X through the triangle should be used to provide a do not bleach warning.


Drying: Additional symbols within the drying process square are designed to indicate the type of drying process to use such as tumble dry, line dry, drip dry, dry flat or dry in the shade. If apparel is designed for tumble dry, but a special cycle is necessary, one underline indicates permanent press while two underlines indicate the delicate-gentle cycle.


Ironing: Additional ironing symbols include dot symbols inside the iron to indicate the proper temperature setting:
Three dots = high
Two dots = medium
One dot = low.
A steam burst can be used under the iron to indicate steaming, or it can appear with an X to warn not to steam.


Dry Cleaning: A letter enclosed in the dry cleaning symbol indicates the type of solvent recommended. Additional symbols can be used to provide warnings about parts of the normal dry cleaning process that should be modified or avoided.


As you can see, in a relatively small space, the care symbol system is designed to offer simple, detailed, straightforward care instructions.

Care for some answers to your questions?

Q. Do I have to use symbols?
A. No. You can continue to use written care instructions if you'd like. The conditional exemption approved by the FTC simply give you the option of using care symbols instead of words beginning July 1, 1997. Using care symbols can result in smaller labels, unify care labeling among NAFTA countries and help consumers buy and care for apparel without knowledge of the language.
Remember, if you do choose to use care symbols you must also provide written care instructions with the garment - for example, on hang tags, stickers or package inserts. (Of course, you may simply state the instructions in both words and symbols on the label itself. This mandate is effective for the first 18 months of care symbol usage - July 1, 1997 through December 31, 1998.

Q. Can I use additional explanatory words with the symbols?
A. Yes. In fact, in certain cases, you may want to use additional words with care symbols in order to clarify care procedures. For example, where laundering instructions are concerned, terms such as with like colors, do not pretreat, remove shoulder pads, do not use fabric softener - to name just a few - may be necessary.

Q. Can I put care symbols on the reverse side of the label?
A. Yes. But it is required that either the care label or the detailed care instructions be visible at the point of purchase.

Q. Do the symbols have to be in any order?
A. Yes, they do. For apparel that needs to be laundered, at last four symbols must be used and they must appear in the following order - washing, bleaching, drying and ironing. If you have evidence that dry cleaning will damage the item and you wish to warn against it, you should add the "do not dry clean" symbol last. If dry cleaning is the suggested care, only the dry cleaning symbol with any appropriate additions, needs to be used.

Q. Do the symbols have to be a certain size?
A. Care label symbols do not have to be a specific size. But they do have to meet the existing Care Label Rule requirement of legibility. Of course, it is important to keep in mind, that failure to print legible care symbols may be considered an unfair or deceptive practice and result in civil penalties.

Q. Can the symbols be stacked down the side of the label?
A. Yes, provided they still appear in the proper order and are legible.

Q. Do the symbols have to be a certain color?
A. The care symbols do not have to be a particular color.

Q. How do care symbols meet with NAFTA's call for harmonizing care labeling?
A. One of the motivating factors in the FTC's introduction of care symbols in the U.S. was mandate by NAFTA to unify care labeling. The ASTM care labeling system has been designed to be harmonious with systems in Canada and Mexico. Currently, care labeling in Canada is strictly voluntary. In Mexico, care labeling is mandatory and there are indicators that Mexico is moving toward accepting the FTC rules on care labeling. Keep in mind that, at present, this ruling only applies to the United States.

Q. Do I have to use dots and temperatures in the wash box?
A. The dots must be used: the temperature can be used in addition to the dots if you wish.

Q. Can I use or continue to use European care symbols?
A. No, you cannot. The FTC has concluded that the care symbols developed by the ASTM are more comprehensive in nature than the European care symbols developed by the ISO. Thus, the FTC has ruled that only ASTM-symbols can be used.

Q. Can I put the symbols and the explanations just on the packaging?
A. No. The FTC's conditional exemption specifically states that care symbols must appear on permanent labels within the garment. Explanations of the care symbols must accompany the garment and can be placed, for example, on hang tags, stickers or package inserts.

Household tips

Problem 1 - how to not shrink my 100% cotton shirt? They all shrink after wash!

Tips - Wash them in cold water only and avoid the dryer but still...learn to read the label. If it is 100% cotton, you should take one size larger that what you need.
Some clothes for works could get dirty enough to need cleaning with warm or hot water...

There are pre-shrunk 100% cotton clothes...the fabric will be washed in very hot water three times and dry them in hot dryer...before they be used to cut into making of clothes...So, buy pre-shrunk or get one size larger.

********
Problem 2 - how do you remove ink marks from a blouse made of 81% polyester, 15% rayon and 4% linen? The care labels says it is washable.

Tips - soak the spot with hairspray, wait 5 minutes and then wash it. The ink came out completely.

********
Problem 3 - how do you remove yellow from your clear vinyl shower curtain? It gets clean in washer, still yellowed.

Tips - Chemicals in water will stain shower curtains plus bacteria (that slimy, pinkish/orange colored stuff) builds up on vinyl too and can cause pink eye and urinary tract infections. Try 2cups white vinegar and a whole box of baking soda in water just to cover, and soak it for 2 hours. Come out absolutely clear!

********
Problem 4 - If I put fabric softener in when I wash sheets and pillowcases, am I attracting more dust mites??

Tips - Bleach would kill them since it kills 99% of household germs...That's Clorox. You have to look on the bleach bottle to make sure it disinfects and sanitizes.

********
Problem 5 - how do I remove gum from fabric?

Tips - Put it in the freezer til it's nice and crispy, don't just put ice.

********
Problem 6 - coffee stain!

Tips - Always read and follow the care instructions and any warnings on the garment label. And, follow the general rules for stain removal:

* Saturate the stain with a pretreatment stain remover.

* Rub the stain with a heavy-duty liquid detergent and launder in hottest water safe for the fabric.

* Do not use soap (bar, flake, or detergents containing natural soap), since soap could make stain permanent or at least more difficult to remove.

* If stain remains launder with bleach safe for the fabric.

Want more of these tips? Stay tune.

Sunday, July 5, 2009

Feeding Moms


We believe that breastfeeding is a blessing from God for both mother and child. We want to bring this an additional blessing to all breastfeeding mothers - nice and affordable nursing wear. To breastfeed in regular clothes, you need to unbutton, untuck, or lift up your clothing to access your breast. This can be both inconvenient and awkward, since it often exposes more skin than you would like, making you feel uncomfortable nursing in public. Dresses pose an even greater challenge, since you either have to take them off, lift up the entire dress over your breast, or select a style that buttons down the front.

Nursing wear helps a mother to be able to breastfeed while looking pretty and discreetly in public places. Especially for mothers who will continue to breastfeed her baby beyond 6 months and does not want to keep wearing large T-shirt for easy access.

Fashion meets versatility in our range of Comfy Mom. This singular design offers a supportive detachable, inter-changeable bra, easy snap straps for minimal exposure nursing, built-in pockets to hold and conceal absorption pads and extended length for post-partum tummy coverage. Ultra soft, high quality fabric in chic colors demands looking and feeling great. Machine washable.

It does not look like nursingwear!
Our nursing openings are well-disguised. There are no obvious nursing flaps, as in traditional nursingwear, to "announce" that you are wearing nursing clothes.

It's fashionable!
Our designers take current styles and adapt them for nursing, so there is no need to sacrifice style just because you are nursing.

We have styles for any occasion!
We do not limit our selection to casual styles. We offer beautiful dressy and career styles as well, because we know that you lead an active life.

Our clothes are easy-care!
Our clothes are machine washable to meet the needs of busy moms like you. Many of our styles are non-wrinkle too, so they travel well.

MOST IMPORTANT - Our eco-friendly organic cotton and bamboo nursing styles flow gracefully with your body and feel safe, cool and silky next to your skin and your baby's.

Bamboo and Organic T-shirts


Our U.S. sales location is in New York, the fashion leader in the world.

Our cotton-growing and garment production is done in China. Our cotton growing, processing and dyeing is certified by to be eco-friendly, with no toxic chemicals next to your skin. In our processing, we use non-chlorine bleach and silicon-free cationic softeners.We only use low impact, azo-free reactive dyes Our state of the art dyeing unit has an on-site effluent treatment plant to help prevent toxic runoff.
Strict testing ensures the absence of contaminants like nickel, lead, formaldehyde, amines, pesticides and heavy metals. we hope to make it easy for our customers to join the organic movement by offering the combined advantage of organic cotton and quality manufacturing at competitive prices. We are also happy to be able to use the most eco-friendly ocean-liner.

We are very aware of the environment impact of plastic inks. Wherever possible we like to print t-shirts and other 100% cotton garments using water-based inks, we presently use a discharge system for light colors onto dark t shirts. All water-based printing is iron-able, soft to touch, and breathable. We always print our organic t shirts using this system, we are pleased to be working more and more with these products.

Short Sleeve Unisex Tee in soft, ring-spun, combed cotton. 5-5.6 oz. wt. Single jersey knit, fine double-needle stitching, ribbed crew-neck. Comfy, cut loose for easy movement.

Eco-fashions

We believe in eco-fashions, clothes that take into account the environment, the health of consumers and the working conditions of people in the fashion industry.

Our clothes and accessories meet such criteria, made using organic raw materials, such as cotton grown without pesticides, do not involve the use of harmful chemicals and bleaches to color fabrics, and are made by people earning fair wages in healthy working conditions.

Famous and up-and-coming designers showcased outfits made from eco-friendly fabrics and materials including hemp, recycled poly and bamboo. Barneys USA was so enthused that it featured some of the environmentally sensitive designs in its window displays for several weeks following the event, imparting a unique mystique to this emerging green subset of the fashion world.

People often perceive the fashion world as superficial, so it’s great to work with materials that are actually good for the environment. When you actually see the fabric swatches you will be blown away. They were gorgeous, and it wasn't hard to design with them.

One of the pioneers of the emerging eco-fashion movement is designer Linda Loudermilk. Her “luxury eco” line of clothing and accessories uses sustainably produced materials made from exotic plants including bamboo, sea cell, soya and sasawashi. The latter is a linen-like fabric made from a Japanese leaf that contains anti-allergen and anti-bacterial properties. Loudermilk also incorporates natural themes in each season’s line—her most recent one being an oceanic motif.

“We aim to give eco glamour legs, a fabulous look and a slammin’ attitude that stops traffic and shouts the message: eco can be edgy, loud, fun, playful, feminine (or not) and hyper-cool,” Loudermilk says.

About us

JQC Resource - come join the quality center of resources!

Recognizing the strength of our management team in this field for more than 18 years, JQC is destined to provide services to the apparel industry to cater for customers particular about good lasting quality apparel. We have grown slowly and steadily, always with customer satisfaction in mind. We market, develop, produce, inspect and ship to our customers in strict compliance to our customers’ requirements.

We have since grown to include manufacturing facilities in Malaysia and China. Besides, we also have co-operation with factories in Vietnam, Cambodia and Indonesia. With production activities in these countries, JQC now serves as the head quarter and trading centre, coordinating the marketing and development activities for the group. We monitor up-to-date production status in all the manufacturing plants and conduct quality assurance checks on behalf of our customers.

Under the guidance of our experienced directors, management and with the dedication of long serving workers, we are transforming ourselves to be strong in innovation and flexibility. The passion and drive of youth merged with the knowledge and experience of maturity strengthen by the scale of our setup will be the essences of who we are.


JQC's Function


We have made JQC Resource the finest fashion agency in Asia. With the group’s global network of manufacturing facilities, we are able to offer our customers economics of scale and flexibility in sourcing, procurement, global order planning, global compliance monitoring and logistic management.


In addition, our sourcing networks link together to find the best source for raw material, fabric and accessories as we know the specialties and capabilities of each country and we have the right contacts with the best of them. 


To excel, we add value to our customers’ businesses by handling shipping, expediting and reducing time-to-market and offering greater control over the whole supply and delivery processes. We ensure consistent quality in every piece of our product and the guarantee is “do it right the first time”.